
How to Make a Mock-Up
These instructions are a very important resource for marking and sewing your mock-up or muslin for a fitting. The markings set up your "fitting grid" of horizontal and vertical lines, allowing you to take control of the fitting process. You can learn more about fitting using a fitting axis by taking a class with me, or by reading my book, The Complete Photo Guide to Perfect Fitting. If you are planning on working on fitting during online consulting with me, or if you will be attending a fitting class or sewing retreat with me, it is helpful to get your first mock-up(s) fully prepared ahead of time so that I have more time with you for fitting.
You can also download a printable PDF file of these instructions.
Marking Your Mock-Up
1) Using a pencil or tracing wheel and carbon paper, mark the center front of the garment on the public side of the garment so I can see it when I'm fitting. If it's a jacket or blouse with a center front entry, the center front should be marked on both fronts.
2) Mark at least one horizontal balance line on the public side of the garment going all the way around the garment. If you are not familiar with using a horizontal balance line (HBL) in fitting, the following will tell you how to establish it on your pattern. Then you can transfer the HBL to the mock-up when you are cutting the fabric out using a pencil or tracing wheel and carbon paper.
Establishing a HBL:
HBL's are always perpendicular to the center front and the grainline. Often you can use a lengthen/shorten line that the pattern provides for the HBL. For a bodice, it's best to have the HBL between the bust and the waist. For a dress or tunic, there should be an additional HBL near the hip level. For a skirt or pants, it's best to have the HBL at or near the widest part of the hip. If you're not sure about the location of the HBL, it's fine to have several. If the lengthen/shorten line is not in a good location, using a ruler, measure up or down from the lengthen/shorten line and carefully mark a new line parallel to the lengthen/shorten line.
If there is not a lengthen/shorten line on the pattern, draw the HBL on the pattern as described below and shown in the following photos:


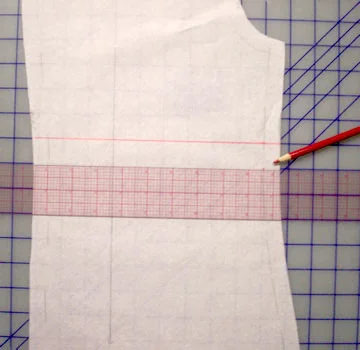
A) Start with the front pattern piece. Place the pattern on a grid board, aligning center front or the grain line arrow with a grid line. Then, in the location you want the HBL to be, draw along one of the perpendicular grid lines using a ruler. In the photo on the right, you can see that I have drawn two HBL's.

B) To mark the location of the HBL on the adjoining pattern piece (e.g., the back, or the side front if the garment has princess lines), place the adjoining pattern piece on top of the already marked pattern piece, aligning the adjoining seams and notches in the area of the HBL. Mark the top pattern piece exactly where the HBL intersects the seam line on the lower pattern piece. (In the following photo, the adjoining pattern piece is on top of the front pattern, with side seams aligned.)
C) Finally, place just the adjoining pattern piece on the grid board, aligning the grain line arrow with a grid. Shift the pattern up or down in this orientation until the mark denoting the new HBL placement falls on a grid line. Using a ruler, draw along this grid line that is perpendicular to the grain line arrow.
D) Repeat steps B and C for any other adjoining pattern pieces.
Sewing Your Mock-Up
1) Sew with basting stitches (stitch length about 4.0) so seams can be released easily.
2) Seams allowances can be any size you prefer to work with. Just make a notation on the muslin itself as well as the pattern indicating the seam allowance.
3) Seam allowances should be on the inside of the garment, and pressed open (unless pressing to one side is specifically called for).
4) If your garment has sleeves, sew the sleeves, but do not set the sleeves into the garment.
5) You do not need to sew on collars or cuffs. For the first fitting(s), the core garment pieces of the front and back are the focus. In later fittings, the sleeves, collars, and cuffs are addressed by pinning them into place.
6) Stay stitch neck edges, and clip if necessary.